There are several problems with the services that many of us use to identify ourselves on the internet and communicate.
Protect Your Data
One problem that most people are aware of, is the issue of what companies like Facebook and Google do with your personal data. Many people aren’t aware of what they are trading in exchange for these “free” services. As companies like Facebook and Google further entrench themselves in our digital culture, there is the danger that fewer people even question what is being exchanged. Children and the younger generations are especially vulnerable to blindly accepting this exchange since they have never known anything else and may have trouble distinguishing between what these companies provide and what is possible.
Reject Monopoly
I’m not a patriotic person, but there are some traditions within U.S. history that I identify with as an American. As Americans, we recognize the harm of unchecked power and influence, and we reject the practices of monopoly and fascism. And yet, due to the nature of capitalism, these forces relentlessly plague our republic.
Facebook (including Instagram and WhatsApp) controls the overwhelming majority of social networking. Not only does this give Facebook excessive power and influence over our democracy, it also excludes friends, family and businesses from online social communication who choose not to use Facebook. Prior to Facebook, et al. we all connected and shared on the democratic playing field of email and telephony. We can restore that democracy and decentralization to social networking.
Embrace Freedom and Community
There are four major components of our digital identity that Open Source I.T. can liberate:
* Two major open source projects that support social networking are Diaspora and Mastadon. You can set up your own Mastadon instance on Yunohost, but Diaspora isn’t available, currently. I have not personally set up or used either application, but let me know if these services or other features of social networking are important for your adoption of Open Source I.T. by voting in the opensourceit.org priorities poll, or by posting a comment on the What Do You Need for Open Source to Work for You? post.
Full Disclosure
I currently still use Github, LinkedIn and Indeed for employment and professional social networking – it’s the last hold-out in my personal software stack that is closed source/SaaS.
The unfortunate reality is that most engineers and employers I know don’t really care about open source, and the recruiters and HR departments that do the candidate sourcing tend to care even less.
While I would love to find a team that cares as much about open source software as I do, it has not been my experience that this is a likely outcome. Therefore I am currently forced to use these systems, so that I can try to find work at companies and on teams where we at least share a little bit in common. Open source is usually a big part of that – but it’s on the level of frameworks and libraries and tools that are typically used to build closed-source software. Along the way I try to contribute back to some of the projects we are using, but unfortunately it’s not very frequent, due to the driving business priorities, etc.
At the current time, all it takes to get started with Open Source I.T. is about $16-$21 per month… and a little love. This includes the small cost of an annual domain name subscription, as well as a server with sufficient processing power to support an abundance of productivity software, including video conferencing and document collaboration.
If you only want email and a website or some limited set of functionality described below, then you could set up Yunohost for as low as $7 per month (including a website, backups and a domain). And for those with spare computers laying around who are willing to play with their router a bit, you can still have all the goodies by offloading your more intensive remote/hosted computing to your home.
Yunohost is at the core of easy, do-it-yourself Open Source I.T. All of the other technologies described on this website presuppose a Yunohost setup. So this is where you want to start.
While setting up Yunohost is unfortunately not super easy for non-technical folks – once you’ve got it up and running, you’ll have access to an amazing ecosystem of open source software, automatically integrated with a single login (SSO) and user provisioning.
When you’re done following these instructions, you’ll be able to set up most of the following software with ease:
Email can be a bit tricky and annoying, especially thanks to Google, Apple, Microsoft and the other big tech monopolists who have seen fit to suppress minorities (self-hosted email) in favor of “the greater good” (eradicate all forms of spam at all costs).
As a result, even if you set up your Yunohost email DNS properly (per the guide below) and score a 10/10 on mail-tester.com, your mail still may be rejected by contacts with Gmail addresses, because Google’s SPAM AI is impossible to predict, and favors corporate email relays (such as themselves) or companies like Mailchimp. Your mail may also be blocked by Apple addresses such as “icloud.com” and “mac.com”, which still uses primitive blacklisting services like Proofpoint.1 Microsoft manages their own black-lists for hotmail.com, outloook.com, etc, as well, but I have personally had a pretty good turn-around (1-2 days) getting them to unblock my mail server IP address after filling out their online form. Comcast uses an awful service called Vade which has a broken de-listing form (at least at the time I attempted to request to be un-blacklisted).
So, if you do need to send out a bunch of emails right away (such as for a marketing campaign) and can’t send a follow-up from your previous email address to “please unspam me”, then you may need to use a “mainstream” email server. Unfortunately, at this point, I’m not sure how to guarantee that your Yunohost email will be delivered with 100% certainty to all of your contacts on the first go, but you should eventually get “blessed” by the email overlords after several days of emailing, being unspammed, etc.
Yunohost comes with Rspamd installed by default. I was surprised to find, however, that while the default settings were configured to be extremely tolerant (accepting of potential spam), I have never-the-less received little to no spam since setting up my mail server a few years ago. Eventually, however, I did start getting some targeted spammers (recruiters) and wanted to figure out how to apply adaptive spam filtering. Unfortunately, this isn’t very straight forward with Rspamd and the supporting Web UI provided in the Yunohost app catalog. So what I wound up doing is simply configuring the “Junk Settings” in Thunderbird (make sure to do this under the Junk Settings for the specific account you want to apply junk filtering to, and then select a folder for “move new junk messages to”, otherwise your junk will just get flagged and stay in your in-box). Clearly, that’s only useful if you’re reading all your mail with Thunderbird, though. For now, to reduce email received on my phone before Thunderbird, I use FairEmail’s spam/block feature.
Ultimately, these aren’t the best solutions, and spam should be blocked on the server side. So I added a TODO item to my TO HACK list to eventually implement something like what’s described here (under the section “Learning from user actions”), so that the Thunderbird mail filtering can pro-actively train Rspamd.
Get a Domain Name
The root of your name/brand identity on the internet is your domain name. This carves out a space for you on the web and should represent you or your business – not Facebook or Google’s business.
Registering a domain name is cheap and easy. While you may not be able to find exactly what you want (because of all the sleazy domain hoarders out there), you should be able to find something suitable for around $10-$20 per year.
To start, all you have to do is create an account with a domain name registrar and buy a domain name. I like gandi.net – “No Bullshit since 1999”.
Getting a domain name is like buying a piece of land to build a house on. Now you need the house.
This guide assumes a hosted server environment, such as a Digital Ocean Droplet, but there should be no limitations for how open source applications are hosted, aside from the required application memory, CPU and space requirements. In fact, Yunohost can even be served from an old computer in your garage! While I think that is very cool, it also presents some practical challenges which get into the evil-doings of the ISP monopolists (like Comcast), who can make this type of setup more difficult.
I’ve been happy using Digital Ocean to host my VPSs and , but there seem to be folks out there who have had some bad experiences, so other good alternatives are Linode and Vultr. Just keep in mind that some of articles on this website may have instructions that are specific to Digital Ocean.
If you’re not interested in email, chat, a website, and access to all the easy one-click installable open source software that the Yunohost marketplace has to offer, then Vultr may be a good option for you since they offer “one-click” installs for Nextcloud and Jitsi.
Select a “Debian 10” Linux distribution as the Operating System for your VPS
This specific Operating System is currently required to run Yunohost. A server with at least 2GB of memory is recommended if you are interested in online document collaboration (simultaneous editing with other users), at least 4GB and 2 CPUs if you’re doing video conferencing.2Cost: $15-20/mo.
Set up your server’s authentication
It is highly recommended that you choose the SSH key method for authentication rather than password authentication.
Unfortunately, at the moment, getting set up with Open Source I.T. requires you to get a little more intimate with your computer than you may be used to, if you’re a non-technical person. The biggest initial hurdle is probably the difference between telling your computer what to do by clicking buttons, versus telling it what to do by typing. The first step is to secure your server with “keys” called SSH keys. Digital Ocean has documentation to help you with this as you are setting up your VPS.
Set up reverse DNS
If you are setting up a VPS with Digital Ocean, make sure you name your Droplet the same as your domain. This will automatically set up reverse DNS, which is important for making sure the email from your new mail server doesn’t go to spam. If you are using a different hosting service, be sure to look into how to set up reverse DNS for that service.
Configure backups
Make sure your hosting service provides backups and that these are enabled. Pricing and options may vary depending on the VPS service you are using. Digital Ocean’s backup service is only a weekly backup, which may not be sufficient if you’re doing a lot of daily data entry. Unfortunately, daily backups (snapshots) will increase your VPS cost, and I don’t think they’re completely necessary if you’re e.g. doing a lot of data entry (such as website content). You could temporarily create more frequent snapshots if it’s a short term thing, or you could create scheduled backups of your databases which wouldn’t carry any additional cost if you’ve already set up File Sync and Remote Storage/Backup. (Let me know if this is a need of yours and I’ll work on a guide for it.) If you have a lot of files and data you want to upload to your server, you’ll also need extra block storage and a separate backup system (described in the article linked above).
Associate your domain with your server
Most domain registrars will also provide DNS management. Just find the DNS records for your domain and make sure there is an address record (called an “A” record) that associates your domain name with the IP address of your VPS. While you’re there, you can also add “A” records for nextcloud.yourdomain.tld and collabora.yourdomain.tld, if you’re interested in remote file management, contacts, calendar, tasks and more with Nextcloud.3
Set up Yunohost
Example Setup using Linode and Google Domains (General Setup)
I recently performed another Yunohost setup using Linode and Google Domains. This setup follows the official Yunohost Setup Guide and should be generally applicable to any VPS and domain registrar.
Set up your VPS
Make sure your VPS label is the same as your domain name. This should enable reverse DNS which is important for email validation. For Linode, there is a separate process for this described here.
Upload a public SSH key. You can follow the Linode instructions here, which should be generally applicable.
Enable backups. Linode is a little more expensive than Digital Ocean ($2 instead of $1 for a 1GB VPS). Their backup plans are different, but comparable.
Once your VPS is created, disable password access by logging into your VPS and setting SSH PasswordAuthentication no. E.g. ssh root@<yourvpsIPaddress> nano /etc/ssh/sshd_config # uncomment/set PasswordAuthentication systemctl restart ssh
When you get to the step for DNS configuration, Yunohost mentions several “required” settings, but you’re going to want to apply all of the extra DNS settings (except for XMPP, if you’re not using XMPP chat). Otherwise you may have issues with HTTPS and email.
After DNS is configured, you should run a Diagnosis. A couple warnings may show up for the missing XMPP DNS records or a custom resolv.conf. These are safe to ignore. If you’re using Linode and other VPS hosts that block email ports, you will see errors in the email section. You will need to contact your VPS host in order to have these ports opened.
Finally, navigate to the Domain configuration page for your Yunohost domain and click “Install a Let’s Encrypt certificate.” (The button may take several minutes to show up as enabled if you have just recently configured your DNS.) You may need to restart or open a new browser in order for the certificate cache to clear and for your browser to recognize the new valid certificate.
Example Setup using Digital Ocean and Gandi
Just follow this guide for getting started with Yunohost on Digital Ocean. (The instructions are for Debian 9 but you should choose the most recently supported Yunohost Debian version, which is currently Debian 10.) Following the instructions may be uncomfortable for non-technical people – but don’t be afraid! There may be some terms you are unfamiliar with, but the directions should be clear and explicit. If they are not, let me know! This is one of the main purposes of opensourceit.org – to fill in the gaps and help regular folks take advantage of Open Source I.T. A few things to note as you are going through the guide:
In the Debian 9 setup section, choose a username that is not one you want to log into your apps with as a regular user. You should use the Yunohost user management interface for creating regular users so they are properly set up in the system with mailboxes, single sign-on, etc. You can also skip the firewall section, as Yunohost will be managing that for you, as well.
If you are configuring your Yunohost DNS with gandi.net, here are some additional steps and clarifications for the Digital Ocean instructions:
Delete all the records created for you automatically by Gandi.
The part where you need to specify “Target” should be yourdomain.tld. for the SRV records (don’t forget the period at the end!), and @ for the CNAME records.
The SPF TXT record should be copy and pasted from the complete DNS configuration specified in your Yunohost administration panel, and the “letsencrypt.org” (with quotes) should be added to the “hostname” section when creating the CAA record.
When the Digital Ocean setup gets to “Step 4 – Installing Applications”, I recommend skipping the “Rainloop” installation. While you can run most of the software you need on the web, email and calendaring is something I recommend you run on your desktop. You not only may want to have your email and calendar available when you are off-line, but also the current best-of-class software in the open source community for email, calendar and contacts is a non-web app: Thunderbird.
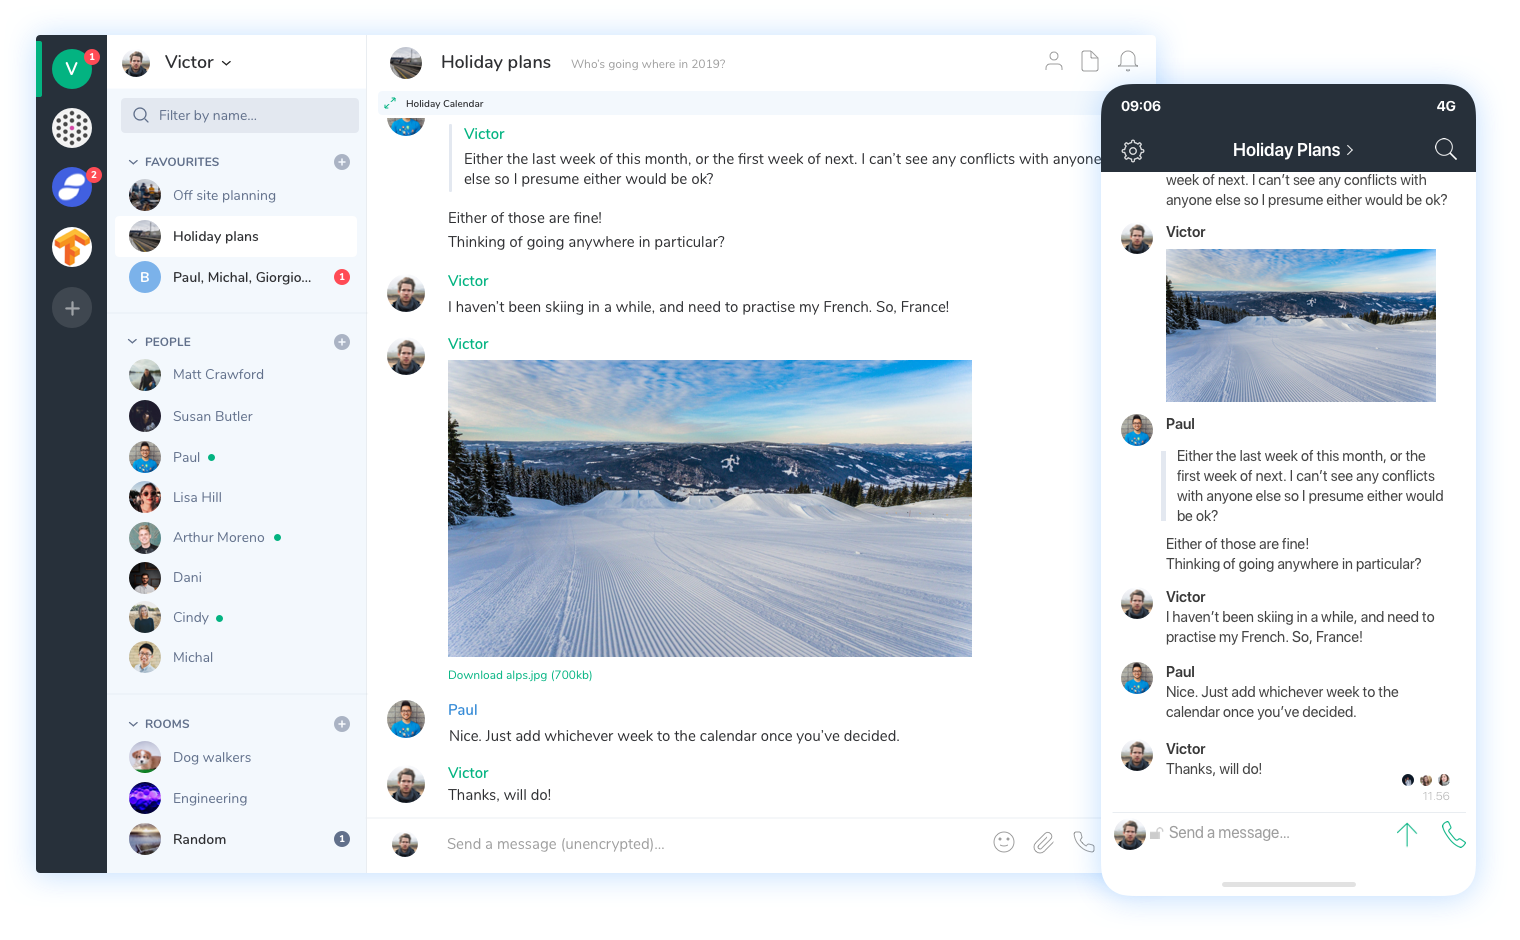
It’s easy to set up your own modern/federated chat server and client once you have set up Yunohost. Just install Synapse and Riot from your Yunohost administration interface.
While setting up your chat system may be easy, understanding how to use it may not be obvious if you have already been indoctrinated by existing chat systems (like Facebook messenger, WhatsApp, Slack, etc). But don’t be afraid! The apps you are using should always have a help menu or links to documentation. Yes, user interfaces should try to be intuitive, but sometimes it’s a question of whether a thing is intuitive, or your expectations have been conditioned to look for things in certain places. This is part of the insidious nature of the tech monopolies that have gained control over our digital behavior. If a new piece of software doesn’t fall in line with how Apple, Microsoft or Google has conditioned our expectations, then we may feel friction in learning a new system and think it’s “not intuitive”.
Let’s break these molds! Slow down and exercise your mental elasticity! Take a little bit of time for some reading and experimenting. If you still can’t figure it out, that’s okay, too! All we can do as software developers is try to create intuitive interfaces, provide documentation and support. So post a comment on this article and I’ll see if I can help.
NOTE: While Nextcloud Talk is useful for collaboration within Nextcloud, such as sharing and chatting about documents you’re editing, I don’t consider it suffiient for typical personal and business chat needs, as it doesn’t have a rich interface with sufficient features, and is not generally federated.
NOTE: This guide assumes you have already set up Yunohost for your self-hosted software needs.
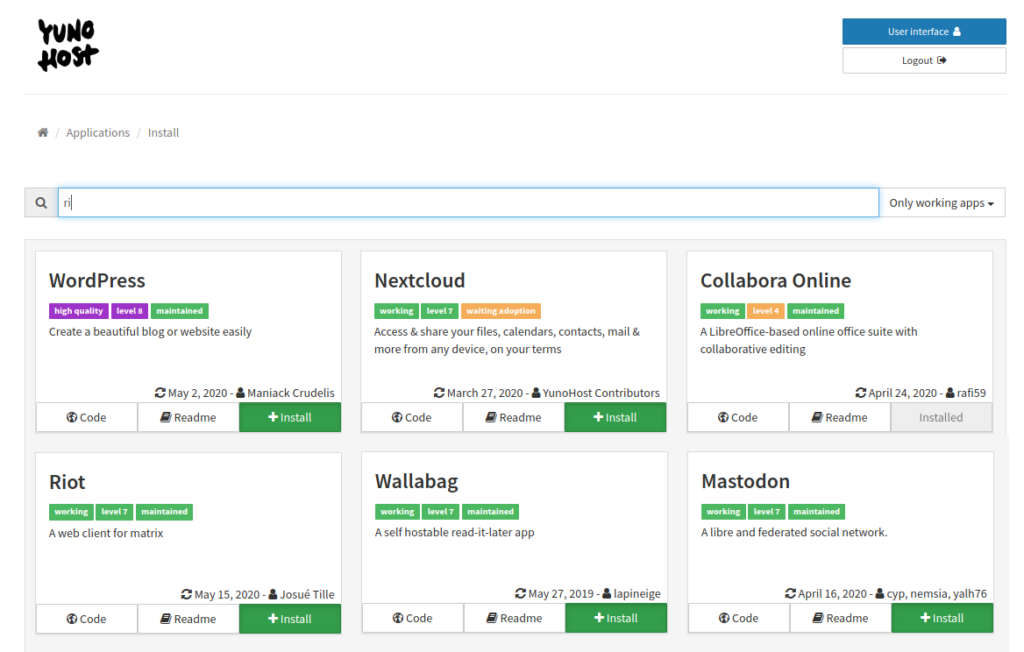
A key component of small business needs, is a basic marketing or e-commerce website. Thankfully, Yunohost provides WordPress, which, like Yunohost and Nextcloud, has its own marketplace of open source (as well as proprietary) software to help you build your site. To get started, simply navigate to your Yunohost software catalog and install WordPress. In addition to following the steps described in this article, there are many great resources provided by WordPress.org which will help you understand how to use and enjoy WordPress.
WordPress Development
Customizing a basic WordPress installation to meet your marketing and e-commerce needs may not be your thing. There are plenty of WordPress “design shops” out there who could help you, but they may be hesitant to work with your Open Source I.T. configuration. There is no reason they can’t, but these “dime-a-dozen” shops often try to minimize friction for maximum profit – or they may be simply technically incompetent. I haven’t done any research on WordPress developers or companies who will work with an existing Yunohost WordPress installation – but they shouldn’t be too hard to find.
That said, there’s still a lot you can do to get started with a basic WordPress site without getting too much “in the weeds”.
Making your Website the Default for your Domain
If you choose to use Yunohost WordPress for your company’s web presence, you will probably want to make WordPress the default application for your domain. To do that, simply go to “Applications > WordPress” within the Yunohost administration interface and click “Make default”. This way, when your customers navigate to your domain on the web, they will go directly to your WordPress marketing or e-commerce site.
After setting your WordPress site as your Yunohost default, you’ll need to access your other business applications at yourdomain.tld/sso – or pretty much any sub-URL that isn’t already associated with an app on your Yunohost instance.
Plugins and Themes
Plugins and Themes are what WordPress is all about. The combination and customization of these two aspects are typically sufficient to produce whatever sort of website you want.
Theme Selection
Theme selection is easy enough. Simply navigate to the “Appearance > Themes” section of your WordPress admin site and activate a theme. Note that the WordPress Theme and Plugin marketplace is a mix of open and proprietary software, and that both options may require payment. While Open Source I.T. is not opposed to paying for software, it is opposed to promoting proprietary software by any means. So, if you are fine paying a little money for a theme that looks right for you, go for it! Just make sure the license for the theme is open source. Otherwise, choosing one of the built-in WordPress themes is usually a great option – open source and cost-free.4
Once you have chosen a theme, you can start adding content.
Plugins
Following is a list of my favorite WordPress plugins – all open source, of course:
Contact Form 7
Contact Form 7 Image Captcha
Easy Footnotes
LuckyWP Table of Contents
Simple Custom Post Order
WP Captcha
YOP Poll
Finally, make sure to activate the Yunohost provided WordPress “HTTP Authentication” plugin, as this is not enabled by default for your Yunohost Single Sign-On.
NOTE: This guide assumes you have already set up Yunohost for your self-hosted software needs.
Nextcloud is another great citizen in the open source software community. The Nextcloud team has put together an amazing set of productivity apps for both web and mobile. Just like Yunohost, Nextcloud offers a central “marketplace” of open source software. In particular, Nextcloud offers great solutions for:
file synchronization and sharing
collaborative document editing
calendaring, scheduling and contacts (to support Thunderbird)
internal company chat
basic task/project management
Setting up Nextcloud is made easy-peasy thanks to Yunohost. Just look up “Nextcloud” in the Yunohost marketplace and click “Install”! (Make sure to use the nextcloud.yourdomain.tld domain you set up earlier.)
Install and Configure Nextcloud Apps
Once you’ve installed Nextcloud, you’ll still need to install apps from the Nextcloud marketplace. In particular, I recommend the following:
Collabora requires a document server which you can easily install from Yunohost.
Configure Nextcloud Email
Next, you’ll probably want your Nextcloud instance to send out email for things like adding attendees to meetings. For that, you’ll need to add your outgoing email settings under “Settings > Administration/Basic Settings > Email server” with the following selections:
SMTP with STARTTLS
authentication method: Login/ required
server address: yourdomain.tld : 587
enter your user credentials
Advanced
Occasionally it may be useful to execute tasks with the Nextcloud command line tool on your Yunohost instance. This is a little tricky and requires you to run the command line tool as the nextcloud user with the appropriate version of PHP and a special flag. You can create an alias for this command in ~/.bash_aliases, like so:
alias occ="sudo -u nextcloud php8.0 --define apc.enable_cli=1 /var/www/nextcloud/occ"
In many circumstances, you can’t run all the software you need as a web application, so you’ll need a few desktop and mobile applications. In particular, I recommend installing the following desktop apps:
Thunderbird (desktop email, calendar and contacts)
Thunderbird is the default mail software for most Linux distributions and can easily be downloaded for Windows or Mac from the Thunderbird website. When you first start Thunderbird, it will guide you through a simple email setup for your Open Source I.T. domain. By clicking on the Thunderbird “Add-ons” menu item, you can install “Lightening”, the defacto calendar and scheduling plugin for Thunderbird, as well as 6“CardBook” to manage your contacts. You can find a bunch of other great open source software plugins for Thunderbird in the add-ons directory, as well. “Shrunked Image Resizer” is handy for automatically reducing attached image sizes, for example.7 Unfortunately, recent versions of Thunderbird have broken backwards-compatibility with many add-ons, so the directory isn’t as rich as it used to be.
You can connect your contacts and calendar to Nextcloud according to the following guide: https://docs.nextcloud.com/server/latest/user_manual/en/pim/sync_thunderbird.html You may need to un-check “Local Address Books” from the “Preferences > Composition > Addressing” settings page in Thunderbird in order for email composition to use auto-complete from CardBook. NOTE: If you have existing contact lists that you are trying to import to Nextcloud, you may need to create groups in Nextcloud with the exact same name as your contact lists in order for these lists to be preserved.
UPDATE 2/28/2021: The latest TB integration guide for Thunderbird now uses TBSync, but I still recommend using this with CardBook, since TBSync (and its extensions) don’t seem to manage contact lists as well. CardBook can also be a little quirky, though – such as some contact lists not showing up in the auto-complete drop-down, but they still autocomplete when you type in the list name and hit tab. Also, the Provider For Google Calendarplugin now appears to be broken and a manual process for integrating Google CalDAV appears to be the best method for adding Google calendars ATM: https://github.com/kewisch/gdata-provider/issues/63#issuecomment-759424469
UPDATE 12/27/2021: Thunderbird 91.3 has a fancy new email/calendar wizard that exposes Google calendars without requiring a plugin
Once you have set up all your accounts and configured plugins (and mail filters) to your liking, you may want to back up your TB profile, in case you need to set things up again on a different computer. You can find out the location of your TB profile by going to “Help > More Troubleshooting Information” the the TB main menu and clicking the “Open Directory” button. I prefer to actually make that directory a symbolic link in my NextCloud file-sync so it is always backed up.
While Nextcloud offers a very convenient Passwords app, I can’t recommend it, out of principle. Since remote password management systems have the ability to decrypt passwords in order to provide them back to your computer, they increase the possible attack area for your passwords to be intercepted. Using a desktop app as the authority for decrypting your passwords keeps you safer in your own computing “burrow” – and adding two-factor authentication (2FA) will keep your passwords about as safe as you can get. That is, of course, if your passwords themselves are strong passwords – either long random strings (that KeepassXC can generate for you), or at least long mnemonic strings (like the Bruce Schneier method).
If you already have a lot of data you want to sync, be prepared for this to take a while, possibly several days, depending on your upload bandwidth and the amount of data.
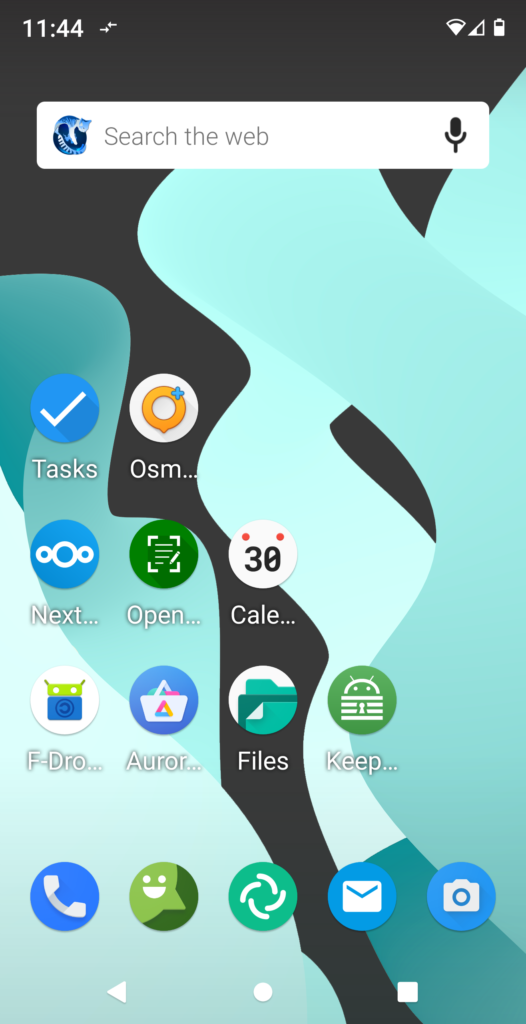
Install and Configure Mobile Apps
The following mobile apps are for Android. While the Nextcloud apps also have iOS versions, I’m not sure what the open source equivalents are for the rest. Apple is not an open source friendly company.
OsmAnd (an on and off-line mapping application for driving directions, etc.)
OpenCamera
Open Note Scanner
IceCat (browser)
Limitations
Unfortunately you may run into some issues if you are using U2F and NFC for logins, depending on your phone, OS and browser. A non-free combination I currently have working on my Pixel 3/ LineageOS device is Chrome + Google Authenticator. 🙁
NOTE: This guide assumes you have set up Nextcloud as your file synchronization system.
Remote storage/backup is, arguably, essential, for anyone. Whether it’s your work data, or just photos from your daily life – you don’t want to suddenly loose all that data because of a hardware failure, or other technical issue.
Likewise, automatic and immediate synchronization of your data is also very useful. So, typically, these features are paired together.
Unfortunately, at the current time, there are no good open source solutions for file synchronization and remote storage/backup that make use of inexpensive object storage.11 (But if you know of one, let me know!) So instead of about $5 bucks for object storage on the order of 250 gigabytes, you’re going to probably have to spend about $15 bucks for block storage on the order of 150 gigabytes. Even so, open source block storage can still be on par with or cheaper than proprietary object storage solutions like Dropbox or Box, if your data storage needs are around 150 GB.
Straight forward installation for all major platforms (via the link above).
Install and Set Up Local Backups
While not necessarily essential, I highly recommend scheduling daily incremental backups for your Nextcloud folder. Without local backups, it is possible for your remote files to be encrypted by a ransomware attacker and sync’d to your desktop before you have a chance to notice. On Linux, I use Déjà Dup13Back In Time, but, unfortunately, I’m not currently aware of any user-friendly open source backup systems for Microsoft or Apple products. (If someone is aware of them, please let me know!)
NOTE: Unfortunately, after recently testing Jitsi with a ~10 screen call, I am unable to recommend the default configuration for larger conferences, due to both client and server issues. The only good known alternative that (supposedly) works well with a default configuration is Big Blue Button. However, BBB’s minimum server requirements are “8GB memory with 4CPU cores” – on a non-virtualized host. While the cost of such a server shouldn’t be an issue for most businesses in need of video-conferencing, the goal of opensourceit.org is to make sure that open source alternatives are at least on par with the cost of proprietary/SaaS offerings. To that end, I will continue to test out Jitsi configurations to try to find a setup that can reliably support at least a ~10 screen conference. (See “Set Up Jitsi > Performance Optimizations”, below.)
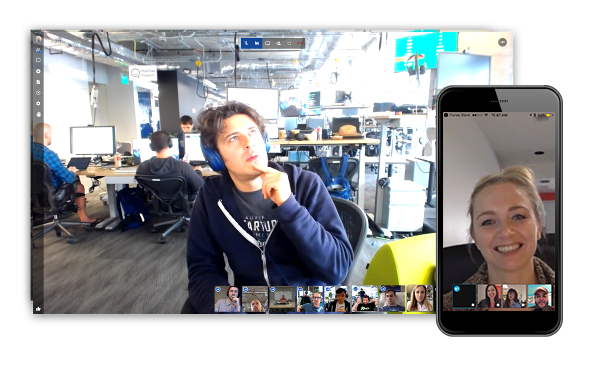
Overview
Unfortunately, at the current time, both Yunohost and Nextcloud don’t do video conferencing very well. For reliable video conferencing, we’re going to have to set up our own Jitsi Meet service. Similar to the Yunohost install, this process also involves several technical steps.
NOTE: If all you want is video conferencing, then you can use the simple “one-click” services provided VPS hosts like Digital Ocean or Vultr for installing Jitsi. But if you want to have fewer servers and save cost, then running Jitsi alongside Yunohost takes a few more steps.This guide assumes you have at least set up your own Debian VPS server.
NOTE: At the time of this writing, the step in the guide sudo add-apt-repository "deb [arch=amd64] https://download.docker.com/linux/debian $(lsb_release -cs) stable"
had an error, and so the Debian release version had to be fetched separately and the line needed to be added manually using a text editor, e.g. lsb_release -cs nano /etc/apt/sources.list
Uncomment the PUBLIC_URL variable (remove the # character at the beginning of the line) in the .env file and set this to videochat.yourdomain.tld, or whatever subdomain where you would prefer to serve your video conferences.
You’ll want to uncomment the variables for ENABLE_AUTH, ENABLE_GUESTS and AUTH_TYPE in .env so you can add users and passwords for your meeting organizers to avoid getting “Zoombombed“. (If you run docker-compose up -dbefore setting these variables, you may need to edit ~/.jitsi-meet-cfg/prosody/conf.d/jitsi-meet.cfg.lua and set authentication = "internal_hashed".)
Performance Optimizations
The following optimizations are currently being tested. You are welcome to give them a try as well:
change the following settings in the ~.jitsi-meet-cfg/web/interface_config.js
Limit number of video feeds forwarded to each client: in /etc/jitsi/meet/$(hostname -f)-config.jsclearly not a preferable option
channelLastN: 4
have all meeting participants only use Chrome/Chromium desktop (no mobile or other browsers) clearly not a preferable option
Start the video service with: docker-compose up -d
Then add at least one meeting organizer with a username and password who is allowed to start the meeting (all other guests can join without needing an account): docker exec -it docker-jitsi-meet_prosody_1 bash prosodyctl --config /config/prosody.cfg.lua register username meet.jitsi password
Configure Yunohost to Serve Jitsi
In the Yunohost administrator panel, add your video conferencing subdomain and add a Letsencrypt SSL certificate.
Then edit the second server section in /etc/nginx/conf.d/videochat.opensourceit.org.conf (using nano or other text editor), remove the line access_by_lua_file /user/share/ssowat/access.lua and add the following lines: location / { proxy_pass https://127.0.0.1:8443; } Restart your Yunohost webserver with sudo service nginx restart.
Now you can create video conference rooms at videochat.yourdomain.tld, add these to meeting invitations, etc.
While not high on the list of business needs, photo management and sharing is a big part of our social and technical landscape, which has largely been co-opted by the major tech monopolists – especially by Facebook.
Everyone takes photos with their phones these days. We typically don’t even use the camera app on the phone – but rather, a camera integration in a social media app like Instagram or Whatsapp. Integrating camera functionality with a sharing platform is great for reducing user experience friction – but it locks us in to a particular platform. However, unlike social networking which currently depends on using a particular platform, photo sharing doesn’t necessarily require a fully fleshed out social network. If all you want to do is share a photo album of a recent trip with friends and family, and maybe see their comments, all you need is a link and some email addresses.
Set Up Piwigo
Note: This guide assumes you already have easy one-click application installation set up with Yunohost. Several of the manual configuration steps require you to have command-line access to your Yunohost server and familiarity with a text editor.Optional (but highly recommended) is that you have already set up a Nextcloud server and have installed the Nextcloud file synchronization app on your phone.
Piwigo is another outstanding open source project that has been serving the free/open source software community since 2001. It is a traditional photo gallery application, but it also comes with an awesome plugin ecosystem (like WordPress) and a mobile app. The following guide will show you how to set up Piwigo with photos synchronized from your phone as well as the following functionality:
tag/category based album creation
anonymous single-album sharing (no login required)
picture comments
full-screen slide-shows
NOTE: Unfortunately, at this time, I cannot recommend the Nextcloud Photos app as it currently depends on a file-system based sharing mechanism which is incompatible with tag/category based sharing.
Install Piwigo with Yunohost
Installing Piwigo with out-of-the-box SSO and user provisioning is easy-peasy, thanks to Yunohost. Simply go to the Yunohost app marketplace and click “Install”.
Configure Piwigo
If all your images have simple names with no special characters, and you don’t use tags to categorize your images, then you can skip these annoying configuration steps. If you do decide to make these custom configurations, also keep in mind that you’ll need to re-apply the changes every time you upgrade Piwigo through Yunohost (because your changes will be overwritten).
Loosen Image Filename Restriction
Unfortunately, at the current time, there is still some manual configuration required for Piwigo to accept images with file names containing special characters, such as spaces, parenthesis, apostrophes, etc. This should be fixed, IMO.14
Edit the Piwigo PHP configuration file: edit /var/www/piwigo/local/config/config.inc.php
IPTC keywords are a fantastic, standards-based way to tag/categorize your photos on the file metadata level. You can add keyword/tags to your photos with desktop photo managers such as Shotwell. (I’m unfamiliar with desktop photo applications for Windows or Mac which do this – if you are, please let me know!)
To configure Piwigo to import IPTC keywords as tags, add the following to your Piwigo PHP configuration file:
Go to the “Plugins > Manage” section of the Piwigo Admin page and install the following plugins:
Read Metadata (to support IPTC keywords and other photo/file metadata – optional)
Share Album (for sharing single-album links that don’t require a login)
Smart Albums (for creating albums based on IPTC keywords – optional)
Fotorama (for full-screen slide-shows)
Synchronize Your Image Files (optional)
Synchronize Your Nextcloud Server
This guide assumes a setup where all of your image files and your Piwigo photo gallery are on the same file system. If you have set up Nextcloud with additional block storage, your files should be available at /mnt/files. To connect your photo directories to Piwigo, simply create a “symbolic link”, like so:
To synchronize your phone, simply download the Nextcloud app, select “Auto upload” from the main menu, and click on the phone folders you want automatically uploaded to your cloud file system. NOTE: Make sure the name(s) of this/these folder(s) is “symlinked” to your Piwigo gallery, as indicated above.
Sharing Albums, Creating Albums from Tags, and Enabling Comments
Now that all of your photos should be synchronized with your Piwigo database, you should be able to browse them by visiting your Piwigo gallery (as an admin) and clicking on the “share” link in the upper-right tool bar.
If your photos have IPTC keyword/tags, you can also create albums to share based on those tags using the “SmartAlbums” plugin.
And if you want your viewers to add comments to photos, simply go to “Configuration > Options > Comments” and check “Activate comments”.
Mobile Access and TV Slide Shows
While Piwigo does have simple and clean Android and iOS apps, these apps do not currently support searching photos by tags or slide-shows (that change photos automatically on a timed basis). There are also no open source smart TV gallery apps that I know of, at this time. If you only plan on using Piwigo with manually uploaded or folder based albums, and are okay manually going through the pictures on your phone, then you can skip this section.
A common use case for using a mobile device for accessing your photos is to look up a specific photo. For example, the other night I was in bed and remembered a picture of a bird I wanted to view again. At the current time, the way to access such a photo with Piwigo on mobile is a bit clunky. What I do is create a bookmark of the desktop app’s tag page and save it to my phone’s home screen, e.g.
Not ideal, but this will allow you to use your tags to quickly find and share photos, as well as start a full-screen slideshow that you can screen-cast to a smart TV. You can also just create a shortcut to the main gallery page (/piwigo), which will let you view normal/manually created albums, as well as create dynamic location-based albums (with the OpenStreetMaps plugin) – which is pretty sweet.
Making Tagging and Dynamic Album Creation More Efficient
The photo management and viewing solution discussed in this article allows you to create/view dynamic albums in two ways:
from tags that you have manually added to your photos, or
by clicking locations on a map
While Piwigo provides a calendar view, it only allows you to view groups of photos by day, which isn’t very convenient if you want to show a slide-show of pics from a multi-day trip. This seems like it should be a pretty easy feature to implement, so I’m going to add it to my list.
Another way to view your photos is by tagging them automatically with machine learning. Google Photos, for example, does this for you, however I have found Google’s (and other’s) object classification system to still be too broad to completely replace manual tagging – except for maybe facial recognition. Nextcloud has a facial recognition app which I plan on trying out.
Since we may still be several years away from a generally available and sufficiently precise open-source auto-tagging AI, manual tagging is still useful. We can also make improvements to the process of manual tagging. One idea I have is to create a simple mobile app (probably with a technology like React Native, which I’ve been meaning to try out) that accesses recent photos in your phone’s gallery and lets you use voice recognition to conveniently add tags shortly after you’ve taken your photos.
However, for $5 bucks a month, it’s hard to justify fighting with your ISP and router to make sure your critical services (like email and website) are working and secure from your dusty spare computer at home (not to mention backed up remotely). It’s much easier to justify hosting a few specific services at home – such as the ones that boost your monthly VPS bill from $5 to $25 or $50 or more. Two services in particular that are useful for basic productivity, but require some beefier computing resources, are document collaboration and video conferencing.
Set Up Your Home Computer
If you’re going the whole nine yards and want to host everything from home, I salute you. Simply follow Yunohost’s Install at home guide and the rest of the guides on this website to setup what you want. However, if all you want to do is set up a few CPU heavy services like the ones described below, then you don’t need a full-blown Yunohost operating system. And, thanks to the wonderful magic of Docker, you probably don’t even need to change anything! Just follow the Docker installation guide for your platform.
Modify PUBLIC_URL in your .env file to point to your computer’s local network address.
Configure A Proxy Server and HTTPS (SSL/TLS)
Jitsi requires a connection over HTTPS. Since Yunohost wont be managing our domains, we need to do this ourselves. An easy (and cost free!) way to set up HTTPS is with nginx-proxy and letsencrypt-nginx-proxy-companion. Just add the following to the `docker-compose.yml` file in docker-jitsi-meet:
If you’ve got Yunohost set up on a VPS, then you’ll need a different domain for your home since, IIUC, HTTPS requires a single host for managing SSL/TLS certificates. Otherwise, you can just point an “A” record for a subdomain at your home network’s public IP address (you can find this easily on Google by typing “what is my IP address?”, or other services like ipchicken.com).
Configure Your Router
Now that your home network is exposed to the internet, you need to tell the internet which computer in your network to talk to. You can do this by setting up port forwarding on your router. To do that, you’ll need to log in to your router and access its NAT configuration. Look at the bottom of your router or a manual to figure out its local IP address and login information.
Note: In order to access your “remote” network from computers within your home domain, you may need to add explicit internal name resolution for your domains to each computer’s /etc/hosts, file e.g.
This is clearly a bit of a hack as it simply adds Collabora to your Jitsi docker-compose file and network. If you’re not running Jitsi you can take out the meet.jitsi network, but you’ll still need a common network for nginx-proxy and letsencrypt-nginx-proxy-companion.
Add Port-Forwarding
nginx-proxy will proxy your Collabora service to port 80, so you’ll need to open that port on your router’s firewall (as described for the Jitsi configuration, above).
Configure Nextcloud
In your Nextcloud instance under “Settings > Administration > Collabora Online”, select “use your own server”, and enter your url: https://collabora.yourhomedomain.tld and click “Save”.
Set Up “Remote” Storage From Home
One of the biggest expenses of a VPS is remote block storage (see File Sync and Remote Storage/Backup). Having a central file repository is useful for keeping data on multiple computers synchronized, but it doesn’t necessarily need to be “remote”, in the sense of “not in your home” or on a hosted VPS. Your file storage should be remotely accessible, however, so that when you’re taking pictures around town or on vacation your files are synchronized from wherever you are. You can do that by simply setting up your remote storage from home.
NOTE: This guide assumes you have already set up Nextcloud to manage remote file synchronization.
Set Up SSH
Your server at home needs to have an SSH service running. Typically this is done on Linux or OSX systems by simply installing OpenSSH. Once you have SSH running, you’ll also need to set up port forwarding for port 22 (or whatever your SSH service is running on) – similar to the instructions above for setting up video conferencing. Make sure you disable password authentication in your SSH config! This important, especially if you haven’t isolated your home server from the rest of your network.
In order to provide remote access to your home file server from your remote file synchronization system, you’ll need to generate a public key on the remote system and copy that to your authorized_keys file on your home system.
Set Up an SSH File System
Once your SSH service is accessible from outside your network, you can mount the folder on your home server that you want to use for file storage for your remote Nextcloud instance. For that, you’ll need to install SSHFS.
After installing SSHFS, you’ll need to “mount” and SSH file system with a command similar to the following:
Replace the uid and gid parameters above with the ID of your nextcloud user (id nextcloud). To make it permanent across reboots, add the following to /etc/fstab:
Finally, make sure the “External Storages” section of your Nextcloud instance (under “Settings > Administration > External Storages”) has an entry pointing to the file mount described above (e.g. /mnt/yourremotefiles). Nextcloud file sync also has an unfortunate “feature” which will cause it to delete all of your local files if there is a disruption in a connection to your file store, such as from a power outage or something that causes your home comptuer/storage to shut down. Some people have said that they are able to prevent this by setting moveToTrash=true in ~/.var/app/com.nextcloud.desktopclient.nextcloud/config/Nextcloud/nextcloud.cfg on your local machine, then they just move the files back. This didn’t work for me, and since you would need to do it for every device, I prefer to set up a simple cron job to detect if there’s a disconnect and shut down the database so your sync client isn’t prompted to delete your local files. Then you can manually re-enable the database once your files are back . To do this,
1. Create a shell script with the following contents:
#!/bin/bash

if [[ $(ls /mnt/yourremotefiles | wc -l) -lt 1 ]]; then
    yunohost service stop mysql
    exit 1
fi
2. Make the file executable:
sudo chmod 775 name-of-your-script.sh
3. Add a crontab to the root user like the following (sudo crontab -e):
One disadvantage of hosting your own file storage at home vs. on a remote VPS is you don’t get de facto disaster recovery. However, depending on your life-style, this may not be much of an issue.
Two main types of “disaster” that could threaten your data that come easily to mind are:
robbery, and
fire
However, if you’re like me, I usually take my laptop with me whenever I leave the home, so robbery is unlikely to be an issue. Similarly, in the case of a fire, my computer is probably one of the first things I’d grab if I had to flee the house.
So, while this isn’t perfect disaster recovery, it might be enough to suit your needs and save you $15+/mo. on hosted block storage. Alternatively, you could set up a remote backup system at a friend’s house. In order to make this convenient for your friend, however, you would probably want to set up a reverse SSH tunnel to your server (to avoid punching holes in their firewall), secure incoming traffic from your server (so backups aren’t compromised if your server is), and make sure your system auto-configures the tunnel in case of a power outage, etc. Not to mention setting up a monitoring system and troubleshooting network issues remotely. In summary, possible, but a bit more complicated.